Do you want to provide a secure connection for your website visitors? Want to take advantage of Google’s ranking boost by moving to HTTPS?
In today’s digital age, online security is paramount. Users have grown increasingly concerned about the safety of their data, and one of the fundamental steps website owners can take to secure their websites is to enable HTTPS, or HyperText Transfer Protocol Secure. HTTPS encrypts the data transferred between a user’s browser and the web server, making it difficult for malicious actors to intercept or manipulate the data.
Moving your website to HTTPS is not only crucial for security but also for SEO (Search Engine Optimization). Search engines like Google prioritize HTTPS websites in their search rankings, making it a smart move for any website owner who wants to improve their visibility online. Additionally, modern web browsers have started labeling HTTP websites as “Not Secure,” which can deter visitors from trusting your site.
In this comprehensive guide, we will walk you through the process of migrating your website to HTTPS. We’ll cover everything from understanding the basics of SSL/TLS certificates to configuring your web server, and ensuring a smooth transition for your website visitors. So, let’s dive in and make your website more secure and trustworthy with HTTPS!
Nimbus Hosting share the info you need to know in this infographic.
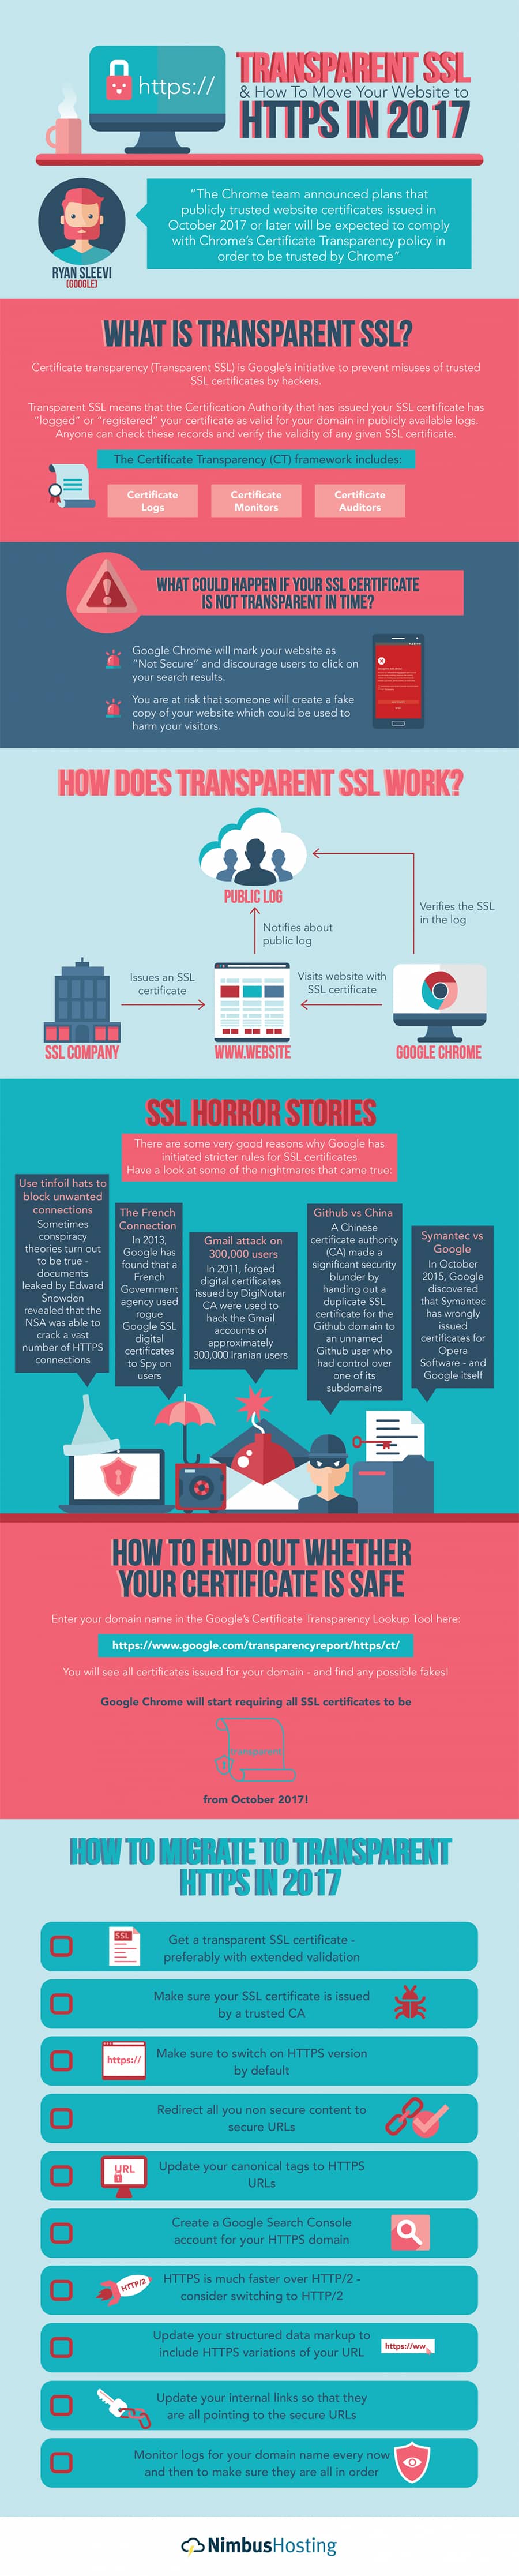
1. Understanding HTTPS and SSL/TLS Certificates
What is HTTPS?
HTTPS stands for HyperText Transfer Protocol Secure. It is the secure version of HTTP, the protocol used for transmitting data between a user’s web browser and a web server. HTTPS uses encryption to protect the data exchanged between the user and the website, making it significantly more secure than the non-secure HTTP.
SSL/TLS Certificates Explained
SSL (Secure Sockets Layer) and TLS (Transport Layer Security) are cryptographic protocols that secure communication on the internet. SSL was the predecessor to TLS, but today TLS is the preferred and more secure option. SSL/TLS certificates are digital documents issued by Certificate Authorities (CAs) to verify the identity of a website and to establish an encrypted connection.
Types of SSL/TLS Certificates
There are several types of SSL/TLS certificates available, including:
- Domain Validation (DV) Certificates: These certificates verify that you have control over the domain. They are typically the least expensive and easiest to obtain.
- Organization Validation (OV) Certificates: OV certificates require the CA to verify both your domain ownership and your organization’s identity. They provide a higher level of trust.
- Extended Validation (EV) Certificates: EV certificates offer the highest level of trust and require a rigorous validation process. The address bar in the browser turns green when using an EV certificate.
- Wildcard Certificates: Wildcard certificates secure a domain and its subdomains with a single certificate.
- Multi-Domain (SAN) Certificates: SAN certificates allow you to secure multiple domains with a single certificate.
Benefits of Using HTTPS
Enabling HTTPS on your website offers several benefits:
- Improved Security: HTTPS encrypts data, making it difficult for attackers to intercept and tamper with information exchanged between the user and the server.
- SEO Boost: Search engines like Google give preferential treatment to HTTPS websites, potentially improving your search rankings.
- User Trust: Users are more likely to trust and engage with websites that display the padlock symbol and “Secure” label in the address bar.
- Protection Against Browser Warnings: Modern browsers mark HTTP websites as “Not Secure,” which can deter visitors. HTTPS eliminates this warning.
Now that we have a foundational understanding of HTTPS and SSL/TLS certificates, let’s move on to the steps you need to take to migrate your website to HTTPS.
2. Preparing for the Migration
Before you begin the migration process, it’s crucial to prepare your website. Here are some essential steps to take:
Backup Your Website
Creating a backup of your website is a crucial precaution. While the migration process is generally smooth, there’s always a small chance that something could go wrong. Having a backup ensures that you can quickly revert to your previous state if needed.
Update Your Content
Check your website for any hardcoded HTTP links or references to non-secure resources (such as images, scripts, or stylesheets). You’ll need to update these to use HTTPS to avoid mixed content issues.
Check Compatibility
Ensure that your web hosting environment and any third-party services or plugins you use are compatible with HTTPS. Older systems or plugins may not fully support HTTPS, leading to potential issues during the migration.
By completing these preparatory steps, you’ll be in a good position to proceed with the migration process smoothly.
3. Choosing the Right SSL/TLS Certificate
Choosing the right SSL/TLS certificate for your website is a critical decision. The type of certificate you select should align with your website’s needs and your budget. Here are the most common types of certificates to consider:
Domain Validation (DV) Certificates
DV certificates are the most basic option. They verify that you have control over the domain by checking DNS records or email addresses associated with the domain. DV certificates are suitable for personal blogs, small websites, or non-eCommerce sites.
Organization Validation (OV) Certificates
OV certificates offer a higher level of validation. In addition to verifying domain ownership, the CA checks your organization’s identity. OV certificates are a good choice for businesses and organizations that want to instill trust in their users.
Extended Validation (EV) Certificates
EV certificates provide the highest level of trust and require a rigorous validation process. The browser’s address bar turns green when an EV certificate is in use, providing a strong visual indicator of trust. EV certificates are ideal for eCommerce websites and organizations that prioritize security and user confidence.
Wildcard Certificates
Wildcard certificates are versatile and can secure a domain and all its subdomains with a single certificate. If you have multiple subdomains and want to simplify certificate management, a wildcard certificate is a cost-effective choice.
Multi-Domain (SAN) Certificates
Multi-Domain certificates, also known as Subject Alternative Name (SAN) certificates, allow you to secure multiple domains with one certificate. If you operate several websites under different domains, a SAN certificate can be a convenient solution.
When selecting a certificate, consider your website’s size, purpose, and the level of trust you want to establish with your users. The choice you make will influence your website’s security and user perception.
4. Obtaining an SSL/TLS Certificate
Once you’ve chosen the appropriate SSL/TLS certificate, you need to obtain it from a Certificate Authority (CA). Here’s how to do it:
Free vs. Paid Certificates
You have the option to obtain either free or paid SSL/TLS certificates. Let’s briefly explore both:
- Free Certificates: There are reputable CAs that offer free DV certificates, such as Let’s Encrypt. These certificates are suitable for many websites, especially when budget constraints are a concern.
- Paid Certificates: Paid certificates provide more options in terms of certificate types, validation levels, and customer support. They are a better fit for businesses and organizations with specific needs.
Certificate Authorities (CAs)
Select a trusted Certificate Authority to purchase or obtain your certificate. Some well-known CAs include:
Each CA may have slightly different procedures for certificate issuance, so be sure to follow their instructions carefully.
Generating a Certificate Signing Request (CSR)
To obtain an SSL/TLS certificate, you’ll need to generate a Certificate Signing Request (CSR). The CSR contains your website’s public key and other information about your organization. Most CAs provide detailed guides on how to generate a CSR for your specific web server software. Follow these instructions to create your CSR.
Certificate Installation
After receiving the SSL/TLS certificate from the CA, you’ll need to install it on your web server. The installation process varies depending on your web server software. We’ll cover the installation steps for Apache, Nginx, and Microsoft Internet Information Services (IIS) later in this guide.
With your SSL/TLS certificate successfully obtained and installed, you’re ready to configure your web server for HTTPS.
5. Configuring Your Web Server
Configuring your web server for HTTPS is essential for ensuring that your website can securely transmit data to and from your visitors. This step typically involves adjusting settings and options in your web server software to enable HTTPS support.
Here are the general steps to configure your web server:
- Access Your Hosting Control Panel: Log in to your hosting provider’s control panel or dashboard. This is where you’ll access the settings and configurations for your web server.
- Locate SSL/TLS Settings: Look for the SSL/TLS settings or SSL/TLS certificate management section within your hosting control panel. This is where you’ll manage your SSL/TLS certificates.
- Install Your SSL/TLS Certificate: If you haven’t already, you’ll need to install the SSL/TLS certificate you obtained in the previous step. There should be an option to upload or install the certificate files provided by your Certificate Authority (CA).
- Enable HTTPS: Once your certificate is installed, navigate to the HTTPS or SSL/TLS configuration section. There, you’ll likely find an option to enable HTTPS for your website. This may involve selecting the installed certificate and configuring the encryption settings.
- Choose HTTPS Version: You may have the option to select the specific versions of HTTPS that your server supports (e.g., TLS 1.2, TLS 1.3). Ensure that you enable the latest and most secure versions available.
- Update Other Settings: Depending on your web server software (e.g., Apache, Nginx, IIS), there may be additional settings related to HTTPS that you can configure. These settings could include protocols, ciphers, and security headers. Consult your server’s documentation or support resources for guidance.
- Save and Restart: After making the necessary changes, be sure to save your settings and restart your web server. This step is crucial for the new HTTPS configuration to take effect.
- Test Your Configuration: Finally, test your website by visiting it using the “https://” prefix in your browser’s address bar. Verify that your SSL/TLS certificate is working correctly, and your site is loading securely.
Remember that the specific steps and options may vary depending on your web hosting provider and the web server software you’re using. If you’re unsure about any configuration details, consult your hosting provider’s support or documentation for assistance. Properly configuring your web server for HTTPS is essential to ensure the security of your website and the privacy of your visitors’ data.
6. Updating Website Links and Resources
To ensure that your website functions seamlessly with HTTPS, you need to update all internal and external links and references to use the HTTPS protocol. Here’s a step-by-step guide:
Fixing Mixed Content Issues
Mixed content occurs when a webpage is loaded over HTTPS, but some resources (such as images, scripts, or stylesheets) are loaded over HTTP. Browsers often block these mixed content resources, which can break your website’s functionality. To fix mixed content issues:
- Use Relative URLs: Whenever possible, use relative URLs for your website’s resources. For example, instead of
<img src="http://example.com/image.jpg">, use<img src="/image.jpg">. This ensures that resources are loaded over the same protocol as the page. - Update Internal Links: Go through your website’s HTML, CSS, and JavaScript files to update any internal links and references to use HTTPS. This includes links within your content, navigation menus, and site structure.
- Update External Links: If your website links to external resources or services (e.g., external scripts, social media profiles), make sure those links use HTTPS. Check with the external providers for updated HTTPS links.
- Update Embedded Content: If your website embeds content from other sources (e.g., YouTube videos, social media posts), ensure that the embedded content is delivered over HTTPS. Most major platforms support HTTPS by default.
- Check Your Content Management System (CMS): If you use a CMS like WordPress, Joomla, or Drupal, search for plugins or extensions that can help you automatically update links to HTTPS.
- Use Content Security Policy (CSP): Implement a Content Security Policy that enforces the use of HTTPS for all resources on your website. CSP can help mitigate mixed content issues by blocking insecure content.
By resolving mixed content issues, you’ll ensure that all resources on your website are loaded securely over HTTPS.
Updating Internal and External Links
After fixing mixed content issues, you need to update both internal and external links to use HTTPS. This includes:
- Navigation menus and links within your content.
- Sitemap files (if applicable).
- Social media profiles and icons.
- Links to downloadable files (e.g., PDFs, documents).
- Any third-party integrations (e.g., payment gateways, APIs) that use HTTP.
Regularly check your website for new content and links to ensure that they also use HTTPS. Additionally, consider setting up 301 redirects from HTTP to HTTPS to automatically correct any incoming HTTP requests.
Updating CDN References
If you use a Content Delivery Network (CDN) to deliver assets like images, scripts, or stylesheets, make sure that your CDN references use HTTPS. CDNs often provide HTTPS support by default, but it’s essential to verify and update your configuration if necessary.
By updating all links and references to use HTTPS, you’ll ensure that your website is fully compliant with secure browsing standards.
7. Testing Your SSL/TLS Configuration
Before announcing your HTTPS migration to the world, it’s crucial to thoroughly test your SSL/TLS configuration to identify and resolve any issues. Here are two primary methods for testing:
SSL/TLS Server Test
Use online tools like the Qualys SSL Labs Server Test to evaluate your SSL/TLS configuration. These tools check for security vulnerabilities, certificate validity, and server compatibility. Address any issues or vulnerabilities discovered during the test.
Browser Testing
Manually test your website using various web browsers to ensure that HTTPS is functioning correctly. Pay attention to:
- Security Indicators: Look for the padlock symbol and “Secure” label in the browser’s address bar.
- Mixed Content Warnings: Check for mixed content warnings in the browser’s developer console. Address any mixed content issues that arise.
- Redirections: Verify that HTTP requests are automatically redirected to HTTPS with a 301 or 302 HTTP status code.
- Functionality: Test all website features, including forms, user logins, and interactive elements, to confirm that they work as expected over HTTPS.
By thoroughly testing your SSL/TLS configuration, you can catch and resolve any potential issues before they impact your website visitors.
8. Implementing HTTP to HTTPS Redirects
Redirecting HTTP traffic to HTTPS is crucial for ensuring that your website is consistently secure. This step helps visitors automatically switch to a secure connection, enhancing their browsing experience without requiring any coding expertise.
Here’s a guide to implementing HTTP to HTTPS redirects without code:
- Access Your Hosting Control Panel: Log in to your hosting provider’s control panel or dashboard. This is where you’ll access the settings and configurations for your website.
- Locate “Redirects” or “URL Forwarding”: Look for the “Redirects” or “URL Forwarding” section within your hosting control panel. This is where you’ll configure the redirection rules.
- Create a New Redirect Rule: In the “Redirects” section, you should find an option to create a new redirect rule. Choose “HTTP to HTTPS” or a similar option from the available types of redirects.
- Specify the Domain: Select the domain or subdomain for which you want to enable the HTTP to HTTPS redirect. Most hosting control panels allow you to choose the specific domain to apply the rule to.
- Set the Redirect Type: Choose the “Permanent” or “301 Redirect” option. This tells browsers and search engines that the redirection is permanent and that they should update their records accordingly.
- Save the Changes: Once you’ve configured the redirect rule, save your changes. The control panel will apply the redirect rule to the selected domain.
- Test the Redirect: To ensure that the redirection works correctly, open a web browser and enter your website’s URL using “http://” (e.g., http://www.yourwebsite.com). The control panel’s redirect rule should automatically redirect you to the HTTPS version of your site (e.g., https://www.yourwebsite.com).
- Verify Secure Connection: After testing the redirection, confirm that your website is loading securely by checking for the padlock symbol and “Secure” label in the browser’s address bar. Ensure that all resources are loaded via HTTPS to prevent mixed content issues.
- Repeat for Subdomains: If your website uses subdomains (e.g., blog.yourwebsite.com), repeat the redirect configuration process for each subdomain if necessary.
By following these steps within your hosting control panel, you can seamlessly implement HTTP to HTTPS redirects for your website without writing any code. This redirection ensures that visitors are automatically directed to the secure version of your site, enhancing both security and user trust.
9. Updating Search Engines and Directories
To ensure that search engines recognize your website’s move to HTTPS and update their index accordingly, you should notify them of the change. Here’s how to update your website’s information with major search engines:
Google Search Console
- Log in to your Google Search Console.
- Click on your property (website) to manage.
- Go to “Settings” > “General.”
- In the “Protocol” section, select “HTTPS” as the preferred version of your website.
- Google will automatically update its index to reflect the change to HTTPS.
Bing Webmaster Tools
- Log in to Bing Webmaster Tools.
- Click on your website’s property.
- Go to “Configure My Site” > “Site Settings.”
- In the “Site Control” section, select “HTTPS” as the version of your site.
- Save your changes.
Updating your website’s status in these search engine tools ensures that search engines prioritize your HTTPS version and continue to index your website correctly.
Additionally, don’t forget to update your website’s sitemap (if you have one) to include HTTPS URLs and submit it to search engines for crawling.
10. Monitoring and Maintaining HTTPS
Migrating to HTTPS is not a one-time task; it requires ongoing maintenance to ensure the security and performance of your website. Here are some key aspects to monitor and maintain:
Certificate Renewal
SSL/TLS certificates have expiration dates, typically ranging from one to two years. Keep track of your certificate’s expiration date and renew it well before it expires. Most CAs offer email notifications to remind you of upcoming renewals.
Monitoring for Vulnerabilities
Regularly check for security vulnerabilities on your website. Use security scanning tools and services to identify and address potential issues promptly. Consider implementing a Web Application Firewall (WAF) to protect against common web threats.
Performance Considerations
Enabling HTTPS can introduce a slight performance overhead due to the encryption and decryption processes. Monitor your website’s performance and optimize where necessary. Use tools like Google PageSpeed Insights to evaluate your site’s speed and make improvements.
Stay Informed
Stay informed about the latest developments in SSL/TLS technology and security best practices. Keep your web server software, CMS, and plugins up to date to patch vulnerabilities promptly.
By actively monitoring and maintaining your HTTPS implementation, you can ensure that your website remains secure and efficient.
11. Common Issues and Troubleshooting
While the HTTPS migration process is generally smooth, you may encounter some common issues along the way. Here are a few potential problems and how to troubleshoot them:
Certificate Errors
- Common Issue: Users may encounter certificate errors when visiting your website.
- Troubleshooting: Verify that your SSL/TLS certificate is correctly installed and matches your website’s domain. Ensure that the certificate is issued by a trusted CA. Check for certificate chain issues, which can cause validation errors.
Mixed Content Warnings
- Common Issue: Browsers may display mixed content warnings, indicating that some resources are loaded over HTTP.
- Troubleshooting: Review and update all references to external and internal resources to use HTTPS. Use browser developer tools to identify which resources are causing mixed content warnings.
Insecure Dependencies
- Common Issue: Your website may rely on third-party scripts or resources that do not support HTTPS.
- Troubleshooting: Contact the providers of third-party dependencies and inquire about HTTPS support. Consider alternatives that offer HTTPS compatibility.
If you encounter any issues during the migration, consult your web hosting provider, web server documentation, or relevant online communities for additional guidance.
12. Conclusion
Migrating your website to HTTPS is a critical step in enhancing its security, trustworthiness, and search engine visibility. By following the comprehensive steps outlined in this guide, you can successfully move your website to HTTPS, protect your users’ data, and improve your online presence.
Remember that HTTPS is not just a one-time setup; it requires ongoing maintenance and vigilance to ensure the continued security and performance of your website. Stay informed about the latest best practices and security updates, and regularly monitor your site for potential vulnerabilities.
With your website now secured with HTTPS, you can provide your users with a safer and more trustworthy browsing experience, setting your site up for success in the modern digital landscape.

Author:
Mark Ford

Mastering the Art of the Landing Page: Design, Copy, and Conversion in Harmony
Are you trying to design a landing page that not only looks great but actually converts visitors into customers? Want to learn how to balance design, copy, and strategy to create landing pages that work in perfect harmony? […]